
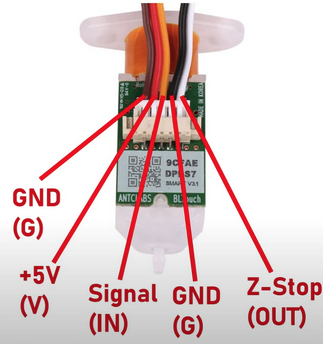
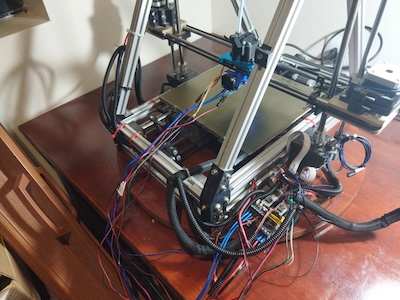
It has been a while since I made a post, so I thought today would be a good day to do so. I had hoped that there weren’t going to be any more battles with my Mini Rambo install effort on the MendelFlex, but I was wrong. The next thing that I attempted to accomplish was to get the BLTouch probe working with the Mini Rambo. Here is a picture of a BLTouch and what the wires are for.
Here is a diagram on how it should be (in theory) attached to the Mini Rambo.
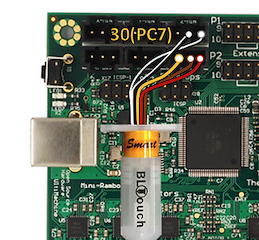
I plugged the BLTouch wires plug into the Mini Rambo Z like shown in the picture above. I had to switch the brown and red wires in the 3 pin connector because as it was, the wiring in the connector is yellow, red, and brown. And the connections to the Mini Rambo need yellow, brown, and red. In the Marlin firmware in the pins_Rambo.h file, I set the servo pin to 30.
#define SERVO0-PIN 30 //BLTouch orange wire
The other wires that I had to check out were the Nozzle/Hotend fan and the print cooling fan. With the Ramps board I plugged the nozzle/hotend fan into a 12 V connector on the board. So it ran all the time. The connectors on Mini Rambo will be controlled by Marlin.
In the Configuration_adv.h file, enable the PROBE_OFFSET_WIZARD to add it to the menu on the printer.
While I was able to get the other components working with the Mini Rambo, I just couldn’t get the BLTouch working with it. The information available was a bit sketchy. Plus while trying to extrude some ABS during testing, the nozzle got clogged. So I just stopped working on the MendelFlex conversion to 24v.
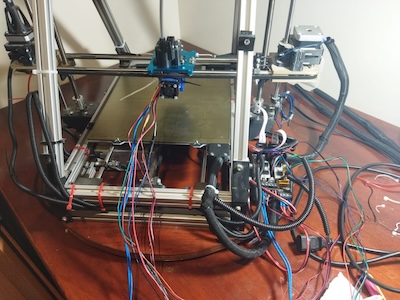
Recently I made up my mind to revert the MendelFlex back to its Ramps 1.4 origins and abandon the 24V effort for a number of reasons. The Ramps 1.4 12v system worked well enough and the BLTouch probe worked too. I uninstalled the Mini Rambo and put back the Ramps 1.4 in. It took me a little bit to make sure the wiring was correct, but I accomplished the task.
While the X and Y homing are working fine, the Z homing needs some work. I need to calculate the Z offset again and put it in the settings. The extruder head just kept going and I had to turn off the printer quickly. The extruder nozzle did not dig into the print bed because on both of the Z sides there is a floating assembly that stops it from doing that. The extruder nozzle just sits on the bed. The solution to this issue was to switch the connections on the on the Z minimum end stop which is used by the BLTouch probe. My initial wiring seemed to be correct, but there maybe something in the Marlin firmware that is switching the two pins. But for now I got it to work and not crash into the bed.
In my prior experimentation with trying to get the external Mosfet to work, one of the things I tried was to turn down the power to the heat bed. I did this in the firmware. But I never set it back to full power afterwards. When I tried to heat up the bed it didn’t work. The led was just pulsing. That pulsing should have tipped me off. I tried another heat bed to see if that was the issue. The same thing happened, no heat and the led was pulsing. So the heat bed was probably ok. At that point I remembered I needed to check the Marlin settings for the power to the heat bed. After I turned turned the power to full, the heat bed heated up just fine.
There are a number of good YouTube channels that cover the topic of 3D Printing. The Teaching Tech YouTube Channel with Michael has the video that I am following for the information in this post. The Teaching Tech website has a lot of good information on 3D Printing. One of its webpages covers the topic of 3D Printer Calibration. That particular page has some good information.
There is a wizard for helping set the z offset and it is available in Marlin. If it has not been set, then it needs to be set in the advanced configuration file (Configuration_adv.h) in Marlin. The setting is called PROBE_OFFSET_WIZARD and the line defining it should be un-commented to set it. The other setting that we are interested in is called PROBE_OFFSET_START. In most cases it can be left at its default value of -4. You don’t have to un-comment the line for it unless you want to change the value to something other that -4. There is another setting in the advanced configuration file that will allow for live Z adjustment. This could come in handy if our initial adjustment with the probe offset wizard needs some fine tuning in real time. That setting is called BABYSTEP_ZPROBE_OFFSET. I will make sure it is set too.
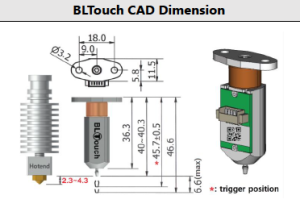
Quick note here. Since I am using a BL Touch probe, I want to mention that the distance between the retracted probe tip and the hotend tip should be between 2.3mm and 4.3mm. A distance of 3mm would be good. Manually lower the hotend tip until it is just touching the bed. A 3mm allen key is useful to measure the distance from the retracted probe tip to the bed. Adjust the BL Touch probe if need be.
Once you recompile your Marlin Firmware, the wizard will become available in the Marlin Menu on the printer. It will be located in Advanced Settings –> Probe Offsets –> Z Probe Wizard. But before starting the wizard it is recommended to manually heat up the extruder nozzle and bed. For example with PLA, set the nozzle to something not hot enough to melt the filament. A setting of 150 will be a good value. For the bed, we set it to what we for normally use for PLA and that would be 60. Once both nozzle and bed heat up to their set temperatures, we will go to the Z Probe Wizard menu. But first make sure that any filament on the nozzle has been removed.
At the start of using the Z Probe Wizard, the printer will be directed to home the XYZ axis. Once that has been done, we will be adjusting the Z offset by gradually moving the nozzle closer to the bed. We will place a piece of paper on the bed and move the nozzle down using fine stepping until it just squeezes the paper between the nozzle and bed. After that we will have to save our new settings by going to the Store Settings menu.
<Maybe A PIcture here fo the menu on the printer>
Now we have to test how well we set the Z offset by doing a test print. From the Teaching Tech web site we will be following the information for setting a good first layer. I will use the GCode generator from the Teaching Tech website.
===============================================
This is a work in progress. Going to Publish it so I can read the info while working on the P3Steel settings.
Almost finished. Will go through the Z Probe Wizard to make sure the directions I wrote down is correct. Then I will write more about using the GCode generator from the teaching tech website.